A project-ready site clearance checklist starts with a site and hazardous-materials survey and finishes with an asbestos clearance certificate and waste transfer notes. Between those two points sits a sequence: services isolation, licensed removal, progressive strip-out and daily documentation. A checklist template covering roughly 25 to 30 checks is a workable format. However, the first action on any job is booking the survey, because nothing else on the checklist can safely start before it.
TL;DR:
- Ensuring a comprehensive asbestos survey is booked and completed before any work begins prevents delays caused by unexpected hazards.
- Clear sequencing of licensed removal, air monitoring, and obtaining a clearance certificate is essential before general personnel re-enter contaminated zones.
- Maintaining accurate, on-site records of disposal notes, clearance certificates, and updated asbestos registers reduces handover delays and audit issues.
- Designating one active clearance zone at a time, with proper controls and documentation, minimizes rework and safety risks on site.
- Proper planning for underground obstructions and stakeholder communication, including utility mapping and timely neighbor notices, prevents costly delays and disputes.
Table of Contents
- What goes into a site clearance checklist before work starts?
- Site set-up and controls: getting access and welfare right
- How do you handle asbestos and other hazardous materials safely?
- Waste management: segregation, licensed carriers and paperwork
- What’s the step-by-step clearance sequence you can run daily?
- Final inspection, certification and handover checklist
- What do experienced contractors do differently?
- Risk assessment and mitigation strategies
- Health and safety protocols and PPE guidelines
- Environmental protection: erosion, water and site runoff
- What if you hit unexpected underground obstructions?
- Communication protocols with stakeholders during clearance
- Equipment selection and maintenance for site clearance tasks
- Author perspective: the mistakes that keep costing project managers time
- Book a compliant site clearance with Mission Demolition
- Sources
- FAQ
What goes into a site clearance checklist before work starts?
Before a single piece of plant moves onto site, three things need to be locked down: what hazards exist, what approvals you hold, and what happens if you find something you did not expect.
A refurbishment and demolition (R&D) asbestos survey has to happen first on any building constructed or renovated before the mid 2000s. This survey needs to record the location, condition and type of every suspected asbestos-containing material, not just flag that asbestos “may be present.” Pair it with a utility location survey, because hitting a live gas or electrical line during clearance turns a scheduling problem into an emergency.
Scope and hazard mapping come next. Someone on the project team needs to walk the site with both survey reports and mark up a plan showing exclusion zones, service runs and any structural risks before a RAMS (risk assessment and method statement) gets written.
Permits and notifications round out the pre-start phase:
- Council notifications for demolition or asbestos removal, where the local authority requires them
- Building management sign-off for shared-site or tenanted commercial jobs
- Lease make-good confirmations specifying the condition the site must return to
- A written discovery response plan: who stops work, who assesses, who authorises restart if unexpected contamination turns up mid-job
Skipping any of these doesn’t just risk a fine. It’s the single biggest cause of mid-project delays, because a stop-work order over an unsurveyed hazard can sit for days while testing and approvals catch up.
Site set-up and controls: getting access and welfare right
Good site set-up decisions made on day one save a lot of grief in week three. Get the compound, access routes and exclusion zones wrong, and you’re moving skip bins or re-routing plant traffic while a crew is trying to work around them.
- Mark out the site compound, pedestrian walkways, plant access routes and designated skip or waste storage areas before any vehicle enters.
- Erect hoarding, fencing and signage around exclusion zones, with asbestos or hazard-specific warning signage where relevant.
- Document at least one clear emergency access route and a rescue plan for confined or elevated work areas.
- Set up welfare facilities (amenities, wash stations, rest areas) appropriate to crew size and job duration.
- Inspect tools and plant on arrival and log the inspection, not just at handover.
- Run a daily briefing covering that day’s tasks, hazards and any changes to the exclusion zones from the day before.
Get this sequence backwards, and it shows. A hoarding line erected after the skip bins arrive means moving both, which is a half-day lost for something entirely avoidable.
How do you handle asbestos and other hazardous materials safely?
An R&D asbestos survey is mandatory before strip-out or demolition of any structure where asbestos-containing materials are plausible, and it has to record type, condition, extent and accessibility of each material found, not a generic “asbestos present” note.
The sequencing rule that matters most here: licensed asbestos removal, followed by air monitoring, followed by an air-clearance certificate from an accredited laboratory, has to happen before general operatives re-enter the area. Skip that order and you expose an entire crew to fibre release for the sake of saving a day.
Pro Tip: Keep the clearance certificate, lab results and updated asbestos register together in one site file from day one. A missing lab report is one of the most common reasons handover gets held up at the very end of a job.
Records to keep as work proceeds:
- Signed clearance certificate for each asbestos removal phase
- Independent laboratory air-monitoring results
- Updated asbestos register showing what was removed and when
- Photographic evidence of the area before general strip-out resumes
Dust exposure isn’t limited to asbestos work either. On any demolition job, engineering controls such as water suppression and on-tool extraction rank as the primary defence, with respiratory protective equipment as a secondary layer, a distinction covered in more detail in the dust control section below.
Waste management: segregation, licensed carriers and paperwork
Waste handling on a clearance site isn’t an afterthought bolted on at the end. It needs its own plan before the first skip arrives.
Set up segregation points for each waste stream on day one: general construction waste, recyclables (timber, metal, concrete), and hazardous waste including asbestos, which always travels separately and sealed. Recycling and landfill-diversion targets should be agreed with the client or head contractor before work starts, since they affect which carriers you book and how many skips you need.
- Use a licensed waste carrier for every hazardous or inert waste load, no exceptions
- Collect a waste transfer note for each load, matched to the carrier’s licence number
- Confirm skip placement against the site plan drawn up in set-up, not an ad hoc spot near the gate
- Schedule covered transport for friable or dusty materials
- Build disposal lead times into the programme rather than assuming next-day collection
A licensed carrier that can’t produce a transfer note on request is a problem you want to find before the job, not during a council audit.
What’s the step-by-step clearance sequence you can run daily?
A progressive, sequenced strip-out, inspection, asbestos check, services isolation, soft strip, waste sorting, final clean, is the standard shape of a compliant clearance job, and it works as a daily operating checklist as much as a project-level one.
- Mobilise and complete a full site walk against the survey and RAMS before touching anything.
- Isolate and tag all services (power, gas, water, telecoms) and confirm isolation with the relevant utility or a licensed trade.
- Complete licensed hazardous-material removal and obtain clearance certification for that zone.
- Begin progressive strip-out zone by zone, not the whole floor at once.
- Sort and remove waste from each zone before starting the next.
- Run a final sweep of each completed zone for loose debris, exposed services or missed hazards.
- Sign off each phase against acceptance criteria before moving the crew to the next zone.
Stop-work triggers should be written down and posted where the crew can see them: suspected undocumented asbestos, an exposed live service, or structural movement all justify halting immediately. Attach photographic evidence, the day’s inspection record and sign-off sheets to the site file as you go, not retrospectively.
Pro Tip: Don’t wait until Friday to catch up on paperwork. A missing sign-off from Tuesday is far harder to reconstruct from memory three days later than it is to complete on the spot.
Final inspection, certification and handover checklist
The end of a clearance job needs its own checklist, distinct from the daily one. Structural integrity, drainage, erosion controls and a debris-free site are the baseline checks before anyone signs off.
Documents to gather before handover:
- Asbestos clearance certificate for every zone where removal occurred
- Waste transfer notes for every load, matched against the waste stream plan
- RAMS and daily inspection records for the full duration of the job
- A signed completion certificate confirming the site meets the agreed scope
Handover itself should include signatures from both the contractor and the client or site manager, an outstanding action register for anything not yet resolved, and a named contact for post-handover queries. The commercial handover process gets scrutinised closely on leased sites where a make-good clause is in play, so incomplete documentation at this stage tends to surface fast.
What do experienced contractors do differently?
Debris left to pile up more than one working area ahead of the crew blocks egress and creates rework nobody planned for. Keep it tight, one zone cleared before the next starts.
Pro Tip: Run the dust-control hierarchy in order: water suppression and on-tool extraction first, respirators second. RPE compensates for a control failure; it isn’t the control itself.
Before any vegetation removal, check for nesting seasons and tree preservation orders. Disturbing an active nest during certain months can carry legal consequences depending on the jurisdiction, so this check belongs in the pre-clearance phase, not as an afterthought once machinery is already on site.
Risk assessment and mitigation strategies
Every site clearance job needs a written risk assessment before mobilisation, and it has to be specific to the site, not a generic template with the address changed. Structural risk, hazardous materials, live services, ground conditions and vegetation all need their own line items with a likelihood, consequence and control measure attached.
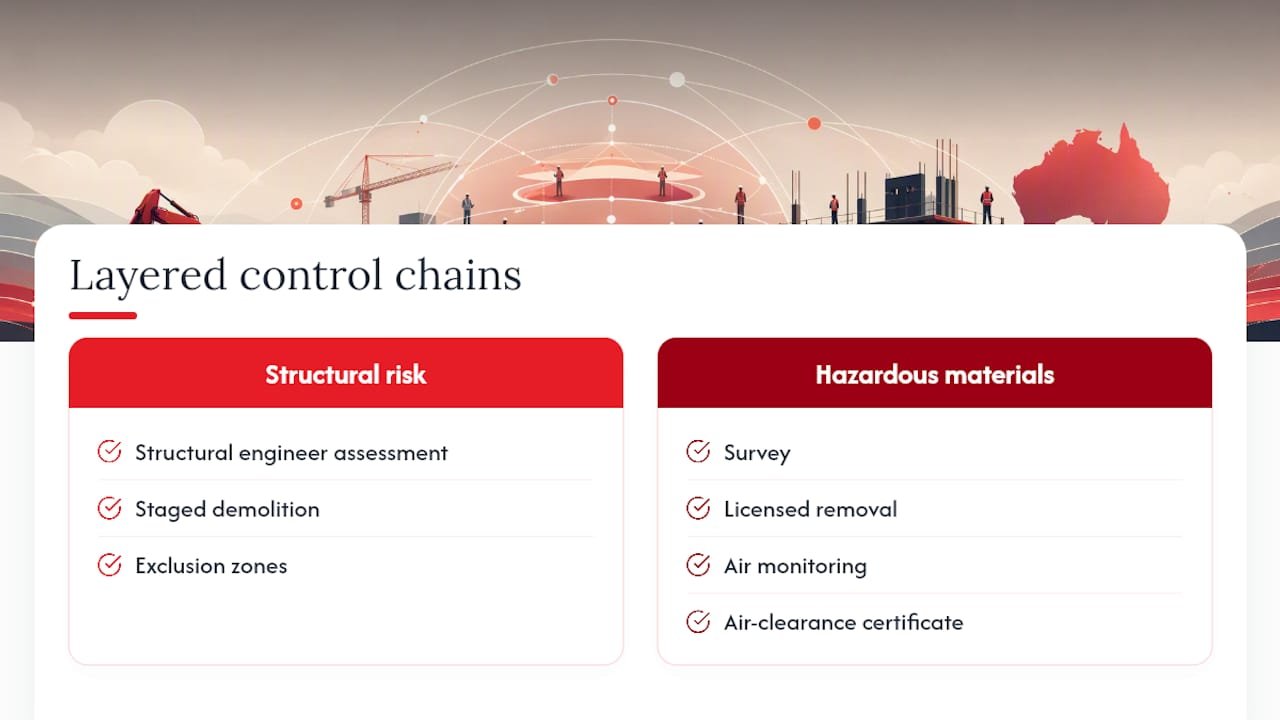
Mitigation works best when it’s layered rather than relying on a single control. For a structural collapse risk, that might mean a structural engineer’s assessment plus staged demolition plus exclusion zones, rather than exclusion zones alone. For hazardous materials, the survey plus licensed removal plus air monitoring plus a clearance certificate form a chain where each step backs up the one before it.
Update the risk assessment whenever conditions change, not just at the start of the job. Finding an undocumented water tank, an unexpected void, or contaminated soil mid-clearance means the original risk assessment no longer covers the actual site conditions, and continuing to work against it is a gap that shows up in incident investigations.
Assign ownership for each identified risk to a named person on site, not to “the team” generally. A risk with no owner tends to get monitored by everyone and acted on by no one until it becomes a problem. Review the register at the daily briefing so new hazards get logged and old ones get closed out, rather than accumulating in a document nobody revisits until something goes wrong.
Health and safety protocols and PPE guidelines
PPE is the last line of defence, not the first. The hierarchy that actually reduces harm runs elimination, substitution, engineering controls, administrative controls, then PPE, and a site clearance plan that leads with PPE has usually skipped the more effective steps earlier in that chain.
That said, baseline PPE for clearance work is non-negotiable once the higher-level controls are in place: hard hats, high-visibility clothing, steel-capped boots and eye protection cover most general clearance tasks. Add respiratory protective equipment rated for the specific hazard, P2 or higher for general dust, a higher rating or supplied air for confirmed asbestos work, and hearing protection wherever plant noise sits above safe exposure limits.
Daily toolbox talks should cover more than just “wear your PPE.” Cover what changed since yesterday: a new exclusion zone, a different waste stream running through a walkway, plant working closer to a boundary than the day before. Site safety guidelines only work if they’re revisited daily, not laminated once and pinned to a fence for the duration of the job.
Incident and near-miss reporting needs a clear, low-friction process. Crews under-report near misses when the process feels punitive or bureaucratic, and a near miss ignored today is often the incident that happens next week under slightly different conditions.
Environmental protection: erosion, water and site runoff
Soil erosion and runoff control matter most in the first days of clearance, before ground cover is stripped and before drainage patterns settle into whatever the site work has created. Silt fencing, sediment traps and staged vegetation removal (rather than stripping the whole site at once) all reduce the volume of loose soil exposed to weather at any given time.
Protecting nearby water bodies starts with mapping them before work begins, not after a runoff event. Stormwater drains, creeks and any groundwater-sensitive areas need to buffer zones and, where required, approved discharge points for site water. Fuel and chemical storage should sit well clear of any drainage line, on funded surfaces that contain a spill rather than letting it spread.
Dust suppression doubles as an environmental control, not just a worker-safety one. Water suppression during demolition and clearance keeps particulate matter from settling on neighbouring properties or waterways, which matters on sites close to residential boundaries or natural watercourses.
Vegetation clearance carries its own environmental obligations beyond nesting seasons. Retained trees marked for protection need physical barriers during the works, not just a note on the plan, because root damage from nearby excavation or vehicle movement can kill a tree months after the visible clearance work has finished.
What if you hit unexpected underground obstructions?
Underground surprises are common enough that the response plan should exist before you need it, not get improvised on the day. Old foundations, disused tanks, unmapped services and contaminated fill all turn up on clearance sites regularly enough that a utility location survey, while essential, should never be treated as a guarantee that nothing else is down there.
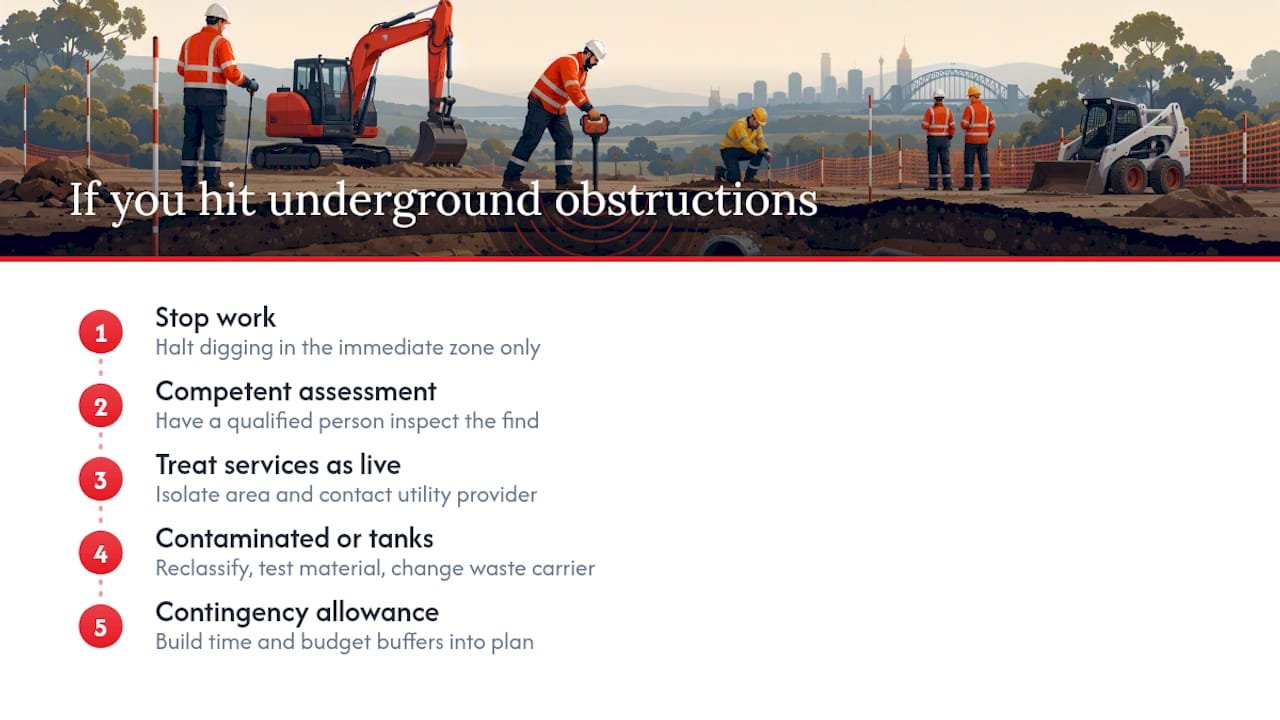
The moment plant or hand-digging crews hit something unexpected, work in that immediate area stops. Not the whole site, necessarily, but the specific zone, until someone competent has assessed what’s been found. Continuing to dig around an unidentified obstruction on the assumption it’s “probably fine” is how a minor discovery becomes a significant delay or a safety incident.
Live services found without documentation need to be treated as live until proven otherwise. That means isolating the immediate area, contacting the relevant utility provider, and not assuming a redundant-looking pipe or cable is actually redundant. A disused-looking gas line has caused more incidents than any contractor wants to explain in an incident report.
Contaminated fill or unexpected tanks change the waste management plan on the spot. Material that was scheduled for one waste stream may need reclassification, additional testing, and a different licensed carrier, which affects both programme and cost. Building a contingency allowance into both the schedule and budget for this kind of discovery is far cheaper than treating every find as an emergency renegotiation.
Communication protocols with stakeholders during clearance
A site clearance job usually has more stakeholders than the crew realises: the client, adjoining owners, council, utility providers, and sometimes tenants who haven’t fully vacated yet. Each needs a different communication cadence, and mixing them up (treating a council notification like a client update, or vice versa) creates confusion at exactly the point clarity matters most.
Daily briefings cover the crew. Weekly (or more frequent, on complex jobs) written updates suit the client or head contractor, and should include progress against the sequence, any variations, and photographic evidence of completed zones. Council and regulatory communication tends to be milestone-based: notifications before start, updates if scope changes materially, and confirmation at completion.
Adjoining owners deserve advance notice of anything likely to affect them directly, noise, dust, access restrictions, or planned outages, ideally 48 hours ahead where practical. A neighbour blindsided by a skip truck blocking their driveway at 7 AM escalates faster and louder than one who got a text the day before.
Set a single point of contact for each stakeholder group and stick to it. When multiple people on a project are fielding the same query differently, inconsistent answers erode trust faster than slow answers do. Keep a simple communication log alongside the site file, who was told what, and when, because disputes over “we were never informed” are far easier to resolve with a dated record than without one.
Equipment selection and maintenance for site clearance tasks
Matching equipment to the actual site conditions, not just the job type, avoids a lot of avoidable downtime. A compact excavator suits a tight urban lot with limited access; a larger machine on the same site means more time spent manoeuvring than digging. Confirm ground-bearing capacity before bringing in heavier plant, particularly on sites with unknown fill or soft ground.
Daily equipment checks belong in the same routine as the crew briefing, not as a separate afterthought. A quick visual and functional check, hydraulic lines, cutting attachments, safety guards, before the first task of the day catches most mechanical issues before they become mid-task failures. Log the check, even briefly, so there’s a record if something does go wrong later.
Dust and water suppression equipment needs its own maintenance schedule, since a suppression system that’s not actually suppressing dust defeats the entire point of specifying it as a primary control. Check nozzles, pressure and coverage regularly rather than assuming a system set up on day one is still performing the same on day twelve.
Attachment selection matters as much as base machine choice. The wrong bucket, breaker, or grapple for the material being cleared slows work and increases wear on both the attachment and the machine. Keep a maintenance and inspection log for hired plant as well as owned equipment, since liability for equipment failure on a hired asset isn’t always where people assume it sits.
Author perspective: the mistakes that keep costing project managers time
The failures I see repeated most often are the same three: skipping or rushing the asbestos survey, sequencing strip-out and waste removal in the wrong order, and treating waste transfer notes as paperwork to chase later rather than collect on arrival.
Three fixes handle most of it. Lock the survey in before any other booking is confirmed. Designate one active clearing zone at a time, never the whole site at once. Require digital waste notes logged the moment each load leaves, not reconstructed from memory at month end.
— Tarek
Book a compliant site clearance with Mission Demolition
Professional site clearance runs the way this checklist describes it: survey first, licensed removal in sequence, documented every step, rather than a quick strip-and-skip approach that leaves gaps in the paperwork. That’s the real difference against a DIY or unlicensed approach, you get a signed clearance certificate, matched waste transfer notes and a completed site file, not just an empty block.
Core services relevant to this checklist include full site clearance, licensed asbestos removal and testing, industrial site clearance and complete project management, covering permits, utility disconnections, hazardous waste handling and final site cleaning. Every job should come with the documentation chain a project manager actually needs at handover: RAMS, clearance certificates, waste transfer notes and a completion sign-off.
Request a site inspection or a fixed-price quote through the Mission Demolition site, and get the survey booked before anything else on your programme.
Sources
For deeper technical detail, SafeWork NSW’s demolition code of practice covers dust and hazard control in full. A practical soft strip-out RAMS template and a ready-to-adapt clearance checklist are both worth reviewing directly. For approval-stage planning on larger projects, construction-stage tracking guidance offers a useful comparative reference.
- Soft strip-out RAMS — SafetyStack
- Office strip out process and checklist (Sydney Fitout Group)
- Site clearance and vegetation safety checklist (Health & Safety Zone)
FAQ
What should I include in a site visit checklist?
Cover hazard identification (asbestos, services, structural risk), access and egress routes, welfare facilities, exclusion zones and emergency contacts. A site visit checklist should be completed before any RAMS is finalised, not after.
What is a Take 5 checklist?
A Take 5 is a short, on-the-spot risk assessment workers complete before starting a task: stop, look, assess, control, and monitor. It’s a quick daily supplement to the broader site clearance checklist, not a replacement for the full survey and RAMS.
What is site clearance?
Site clearance is the process of removing structures, vegetation, debris and hazardous materials from a plot to prepare it for construction or redevelopment. It includes survey work, licensed hazardous-material removal, demolition where required, and waste disposal through licensed carriers.
What is a daily excavation checklist?
A daily excavation checklist confirms ground conditions, service locations, shoring or support requirements, and any changes since the previous day’s work before excavation resumes. It should be reviewed against the utility survey and updated if unexpected obstructions were found the day before.
Does Mission Demolition provide licensed asbestos removal as part of site clearance?
Yes, Mission Demolition offers licensed asbestos removal, testing and clearance certification as part of its full site clearance and demolition services. Current pricing and service details are available directly on the Mission Demolition website.
