
Yes, some tile adhesives, particularly black mastic and other cutback compounds, commonly contained asbestos before 2003. If you suspect yours does, stop work immediately, avoid creating dust and arrange testing or a licensed assessment before you go any further. Undisturbed, intact adhesive is generally low risk. Disturbing it is what creates exposure.
TL;DR:
- Original adhesives in homes built before the mid 1980s are strong candidates; homes built through 1990 may contain asbestos because manufacturers phased it out gradually.
- A black bituminous texture or paper backing beneath older vinyl raises suspicion, but only laboratory testing at a NATA accredited facility confirms asbestos.
- If tiles or adhesive have been disturbed, stop work, isolate the area, avoid sweeping or vacuuming, and contact a licensed assessor before handling remaining material.
- A positive test does not require automatic removal; intact material may stay covered or sealed, while damaged areas or planned renovation may require licensed removal.
- Some jurisdictions allow unlicensed removal of up to about 10 square metres of nonfriable material, but strict precautions and authorized disposal still apply.
Table of Contents
- Which adhesives historically contained asbestos and where they turn up
- Why you can’t just look at it and know
- When bonded adhesive turns into an airborne hazard
- What to do right now if you’ve disturbed asbestos adhesive
- Testing and assessment: how a result actually gets confirmed
- Deciding what to do: leave it, cover it or remove it
- How licensed removal actually works
- What homeowners get wrong and why caution pays off
- Get an assessment before you touch another tile
- FAQ
- Sources
Which adhesives historically contained asbestos and where they turn up
Before 2003, asphaltic cutback adhesive, often called black mastic, was widely used across Australia to bond floor coverings including vinyl tiles, linoleum and wood laminates. Cement-based adhesives and some grouts could also carry asbestos fibres as a binding or strengthening agent.
You’ll typically find these products in:
- Vinyl and linoleum tile installations from the 1960s through the 1980s
- Carpet underlay and adhesive layers in older homes
- Ceramic tile grout and backing boards in bathrooms and kitchens
- Wall and ceiling tile adhesives in commercial and residential buildings
If your home or the section you’re renovating was built before the mid-1980s, treat any original adhesive as a strong candidate for asbestos content. Properties built between the mid-1980s and 1990 may also contain it, since manufacturers phased out asbestos gradually rather than on a single date.
Why you can’t just look at it and know
Visual clues can point you in the right direction, but you cannot reliably identify asbestos by sight. Laboratory testing by a NATA-accredited facility is the only method that gives a confirmed answer, because asbestos fibres are microscopic and many non-asbestos adhesives look identical to the ones that contain it.
That said, some signs should raise your suspicion:
- A black, tar-like or bituminous texture, often described as black mastic
- Paper or millboard backing beneath vinyl or linoleum tiles
- Tile dimensions and surface textures typical of pre-1990s manufacturing
Don’t pry up a corner to “check” or snap a close-up photo expecting it to settle the question. Prying, scraping or sanding to get a better look is exactly the kind of disturbance that releases fibres, and a photo tells a lab nothing. If you do want to collect a small sample yourself, there’s a strict DIY sampling procedure that limits the sample size and the risk, but it’s not something to improvise.
Pro Tip: Treat any adhesive in a pre-1990 home as suspect until a lab result says otherwise, rather than trying to rule it out yourself.
When bonded adhesive turns into an airborne hazard
Asbestos in adhesive is usually “non-friable,” meaning the fibres are bound tightly into the material and can’t easily crumble into dust. When these materials are undisturbed and in good condition, they present a very low health risk. The danger starts when that bond breaks down, turning bonded material friable and releasing fibres into the air.
Activities that commonly cause this include:
- Sanding, grinding or scraping adhesive off a subfloor
- Cutting, drilling or using power tools near tiles or adhesive
- Demolition work or forceful tile removal
- High-pressure washing of adhesive residue
Weather damage, water ingress or physical impact can also break down bonded material over time, so even adhesive you’ve left alone for years is worth reassessing before any renovation.
What to do right now if you’ve disturbed asbestos adhesive
If you’ve already scraped, sanded or ripped up tiles and adhesive before reading this, don’t panic, but act immediately:
- Stop work and leave the area straight away.
- Isolate the space: close doors, keep people and pets out, and avoid walking dust into other rooms.
- Never dry sweep or vacuum the area, since this stirs fibres into the air rather than removing them.
- If it’s safe to do so, lightly mist the area with water to help settle dust, and seal off vents or gaps.
- Contact a licensed asbestos assessor or removalist to inspect and test the site.
- Note what happened, when and how much material was disturbed, and leave any remaining undisturbed material in place for testing.
Rapid, calm action like this reduces exposure risk and keeps enough material intact for an accurate assessment.
Pro Tip: Photograph the area before you touch anything further. It helps an assessor judge scope without extra disturbance.
Testing and assessment: how a result actually gets confirmed
A NATA-accredited laboratory test is the only way to confirm whether your adhesive contains asbestos. You have two realistic paths: engage a licensed asbestos assessor or sampler to collect and submit material on your behalf, or follow a tightly controlled small-sample protocol yourself, limited to a few square centimetres, with full PPE and careful sealing of the sample.
DIY sampling carries real risk if done poorly, since even a small cut into bonded material can release fibres if you’re not careful. A licensed assessor removes that guesswork and gives you a documented result.
A positive result doesn’t mean instant removal. It triggers a risk assessment that weighs the material’s condition, its location and the size of the affected area, then points you toward leaving it in place, encapsulating it or arranging licensed removal.
Deciding what to do: leave it, cover it or remove it
In many cases, the safest and cheapest option is to leave bonded adhesive exactly where it is. State guidance consistently recommends leaving undamaged bonded asbestos material in place rather than disturbing it unnecessarily, protecting it instead with new flooring laid over the top or a sealant coat.
Your main options are:
- Leave in place: appropriate when the adhesive is intact, undamaged and won’t be disturbed by planned work.
- Encapsulate or cover: sealants or new flooring laid over the top, though wet sealants can be slippery underfoot and some coatings need reapplication over time.
- Licensed removal: necessary when the area will be disturbed, the material is damaged or you’re planning a full renovation.
Many jurisdictions allow small amounts of non-friable material, commonly up to around 10 square metres, to be removed without a licence, but strict precautions still apply. Waste must be double-bagged in heavy polythene, sealed, clearly labelled and taken to an authorised disposal facility. If you’re planning new flooring over adhesive you’ve decided to leave in place, it’s worth checking compatibility with underfloor heating systems before you commit to a covering option.
How licensed removal actually works
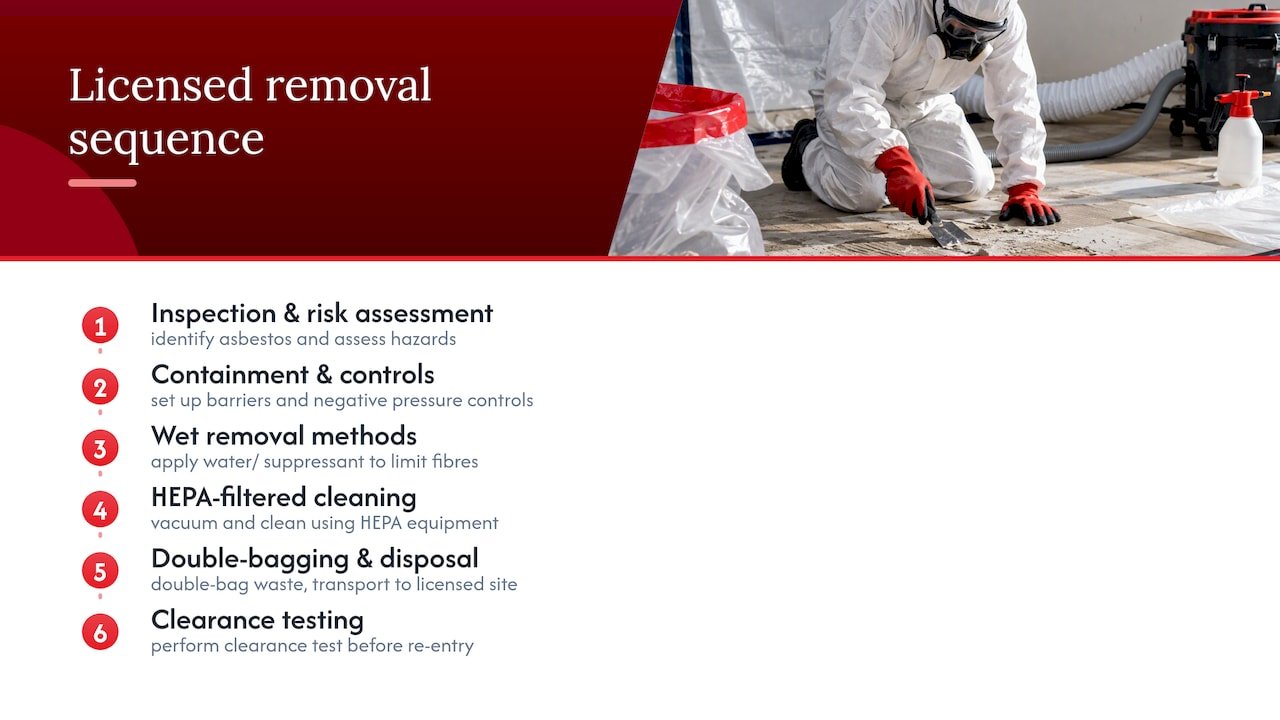
A licensed removal job generally follows the same sequence: inspection and risk assessment, setting up containment and controls around the work area, wet removal methods to keep fibres from becoming airborne, HEPA-filtered cleaning of the space, then double-bagging and transporting waste to a licensed disposal site. A clearance test confirms the area is safe before anyone moves back in.
Before hiring anyone, ask for their asbestos removal licence, current insurance, a written removal plan and a clearance certificate once the job’s done. We handle asbestos removal this way on every job, with compliance and documentation built into the process rather than treated as an afterthought.
What homeowners get wrong and why caution pays off
The costliest mistakes we see are sanding adhesive to “check” it, dry scraping tiles before testing, or skipping testing altogether because the adhesive looks fine. Each of these turns a contained, manageable job into a bigger, more expensive one. A measured, tested approach almost always costs less than cleaning up after a mistake.
— Tarek
Get an assessment before you touch another tile
We inspect suspect adhesive and flooring, coordinate NATA-accredited lab testing and ensure licensed removal and disposal when needed, so you’re not guessing your way through a renovation. Before you book anyone, ask for their removal licence, current insurance and a clearance certificate on completion, and we’re glad to put ours on the table.
- We arrange asbestos inspection and testing before you start any renovation work.
- We carry out licensed asbestos removal with full containment and clearance testing.
- We handle disposal through authorised facilities with proper packaging and labelling.
If you suspect your tile adhesive contains asbestos, get in touch for an assessment and we’ll talk you through the next step.
This article is general information, not a substitute for advice from a qualified doctor. Consult a qualified healthcare professional about your own circumstances before acting on anything here.
FAQ
Can tile adhesive contain asbestos?
Yes, older tile adhesives, particularly black mastic and other asphaltic cutback compounds, commonly contained asbestos before 2003. If your flooring or adhesive predates that, assume it’s a possibility until testing rules it out.
How can I tell if an adhesive is asbestos?
You can’t tell for certain just by looking. Laboratory testing by a NATA-accredited facility is the only reliable confirmation, though a black, bituminous texture under older vinyl or linoleum is a common warning sign worth investigating.
What does asbestos tile adhesive look like?
It’s often a black, tar-like, bituminous substance known as black mastic, sometimes paired with paper or millboard backing beneath the tile. Appearance alone can’t confirm asbestos content, so treat it as a clue rather than a diagnosis.
I accidentally ripped up an asbestos tile. What should I do?
Stop work immediately, leave the area and keep people and pets away from it. Avoid dry sweeping or vacuuming, lightly mist the area if it’s safe to do so, and contact a licensed asbestos professional for assessment rather than continuing the job yourself.
Sources
- Adhesives containing asbestos – Asbestos Product Guide
- How to identify asbestos — Asbestos NSW
- Asbestos and health risks — NSW Health
